

Can Service Wires Enter Bottom Of Panel
Breaker Box Safety: How to Connect a New Circuit
Add a new circuit to your home'south wiring
Every editorial product is independently selected, though we may be compensated or receive an affiliate commission if you purchase something through our links. Ratings and prices are authentic and items are in stock as of time of publication.
![]() Time
Time
A full day
![]() Complication
Complication
Advanced
![]() Cost
Cost
$51–100
Introduction
Calculation a new circuit can be a daunting and even dangerous job. We show you how to do information technology with step-by-step instructions and important, life-saving prophylactic tips.
Tools Required
Materials Required
- AFCI excursion billow
- Cable clamp
- electrical staples
Know What You're Getting Into
We believe in rubber DIY. That'south why nosotros've always been reluctant to evidence readers how to open up a billow box and connect a new circuit. Even with the power shut off, in that location's a chance you could touch on the wrong parts and kill yourself. But then we figured if we didn't evidence you, yous'd just go search information technology somewhere else. And that scared u.s. fifty-fifty more. So we're going to walk you through the process, showing you the safest way to open the breaker box, wire a new breaker, and test your work.
Opening the main circuit breaker panel box and adding a circuit is actually pretty easy. Y'all merely take to connect three wires to add a circuit, and each circuit wire is color-coded. But there are some safe precautions, and if yous ignore them, you could kill yourself. Really. If you follow our safety steps in order and to the letter of the alphabet, you'll be fine. But if at any point you're unsure how to proceed or feel uncomfortable with the project, call an electrician.
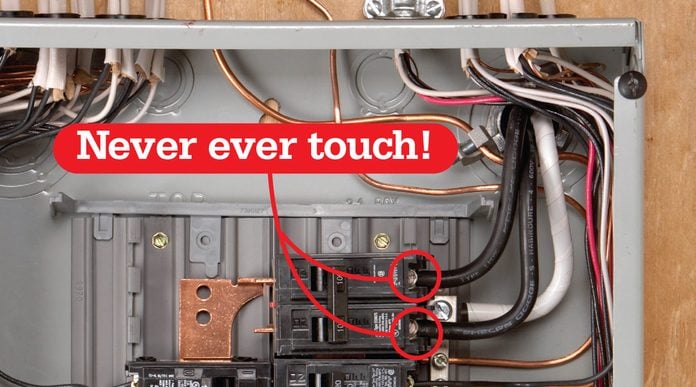
Stay away from the large wires and lugs. They're always live, even with the chief breaker (service disconnect) shut off. If you touch them, y'all could die. Cover the live areas with a cardboard shield to prevent adventitious contact while adding a circuit. If you have any doubts nigh which areas stay live, contact an electrician. There's a reason awareness of electric bug is a key step in preventing fires in the habitation.
Watch this video to see the safe style to connect a new circuit yourself:
Get the Right Parts and Tools
Earlier you become shopping, open the door of your breaker box and copy the manufacturer'southward proper noun, the box model number, and the way numbers of the breakers that are approved for your box. Then buy one of those breakers. If your home eye doesn't sell the right model or make, y'all'll have to go to an electrical supplier. You cannot install a circuit breaker fashion that isn't specifically approved for use in your box — even if it fits inside the box.
While at the store, option up a few 1/ii-inch plastic snap-in cable clamps to secure the new cablevision. They're safer than metal clamps because you don't put your hand in the panel to install them.
If you need a reminder virtually how bad some amateur electrical can exist, cheque out this listing of the nigh mutual electrical code violations.
You have to shut off the ability to your whole firm, so you'll demand a powerful work light. An LED headlamp is also a great idea and then y'all won't accept to juggle a flashlight, wire strippers and a screwdriver. Round up a utility knife, wire strippers, electrical tape, a circuit tester (not a voltage sniffer), and a flat-blade screwdriver or No. ii foursquare-drive tip for your multi-bit driver. These are the ii must-have tools for DIY electrical piece of work.
Project stride-by-pace (12)
Pace 1
An Within Wait at Your Main Billow Panel
Your main breaker panel might non exist exactly similar the 1 here. With any console, find the large cables and the lugs they're continued to. They're the parts that are ever live, fifty-fifty when the chief breakers are switched off. Here's how to know what's what:
- A: Chief lugs. They're ever live — fifty-fifty when the main breaker is off. NEVER TOUCH THEM.
- B: Main cables. The black ones are always live. And although they're insulated, avoid touching them.
- C: Chief breaker. Always switch it off before removing the console's cover.
- D: Breaker. The hot wire (usually cherry or black) from each circuit connects to a breaker. If you're installing an AFCI breaker (as shown on the following pages), you lot'll besides connect the neutral wire to the billow.
- Due east: Breaker charabanc. Distributes power from the master breaker to the individual excursion breakers. Each breaker snaps onto the bus.
- F: Neutral omnibus. All ground and neutral (white) wires connect here. If you're installing a standard breaker, the neutral (white) wire connects here, too. If you lot're installing an arc-fault circuit interrupter (AFCI) billow, yous'll connect the neutral to the breaker and run a "pigtail" wire to the neutral bus.
- G: Breaker infinite. This panel has room for iii more breakers. Yous tin can install your new billow in whatsoever open space.
Plus: Check out these eleven real-life epic electric fails.

Step 2
Your Master Breaker Panel Might Look Like This
The photo shows a different configuration where the large cables and lugs are located on the right-hand side of the circuit breaker box, rather than at the center.
![]()
Footstep 3
Power Down, So Remove The Cover
- Turn off all computers in the house earlier you switch off the power.
- So switch off the main breaker (the service disconnect).
- Remove three of the panel box cover screws.
- Then hold the cover securely while you remove the fourth spiral.
- Pro tip: If it slips while you lot're removing screws, it can damage the billow handles.

Footstep 4
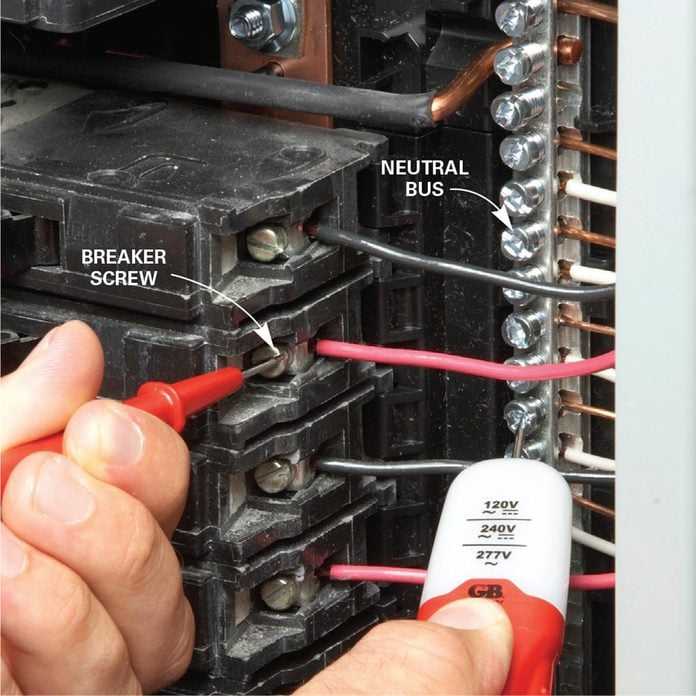
Examination to Brand Certain it's Expressionless
- It'south dangerous to assume the power is really off just considering you've flipped the service disconnect to the off position. Be absolutely sure all the power is off.
- In that location's a slim chance that the service disconnect didn't work properly, keeping power to some breakers.
- So test each and every breaker to make sure information technology's really dead.
- Touch i pb of a test light to the neutral bus and the other pb to the screw on each breaker.
- If the exam lite lights up, stop and call an electrician.
Step 5
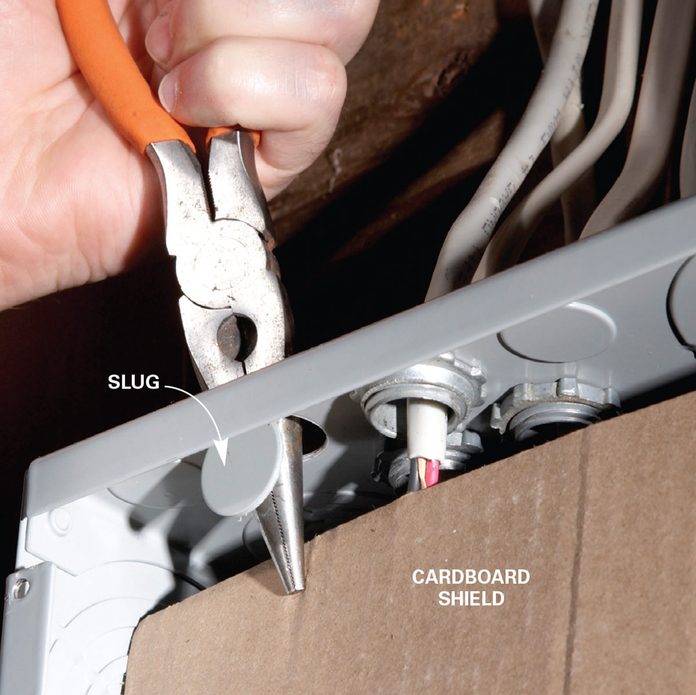
Insert a Cardboard Safety Shield
- You tin insert the new cablevision into any knockout on the top, bottom, or sides of the panel box.
- Find the least congested area and remove one modest knockout.
- Jam a needle-olfactory organ pliers or a short screwdriver into the knockout to bend it down.
- And then grab the "slug" with your pliers and twist it back and forth until it breaks off.
Step 6
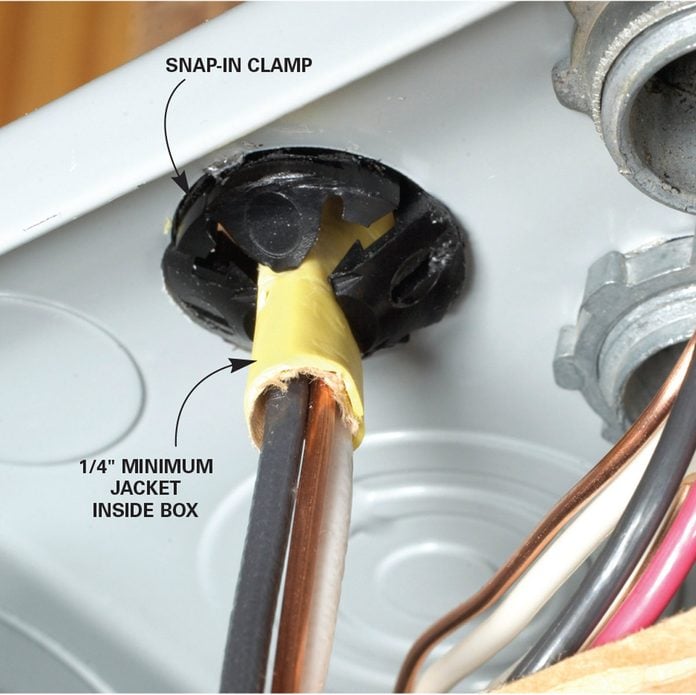
Run the Cable Through the Clamp
- Snap in a plastic clamp so feed in the cablevision.
- Pro tip: The screw-style ones shown aren't as like shooting fish in a barrel to use.
- Hold the cable upward to the box to determine how much of the outer jacket you lot should strip off.
- Piece off the jacket and remove the newspaper insulator.
- Then wrap the ends of the loose wires with electrical tape to prevent them from touching a live portion of the box.
- Pro tip: Tape the wires together so one doesn't stray behind the cardboard.

Step 7
Push Until the Jacket Enters the Clench
- Go along pushing the cable into the clench far enough to get at least one/iv-inch of the outer jacket within the box.
- Then secure the cable outside the box with an insulated staple within 12 inches of the clamp.
Step 8
Route the Cable and Install the Breaker
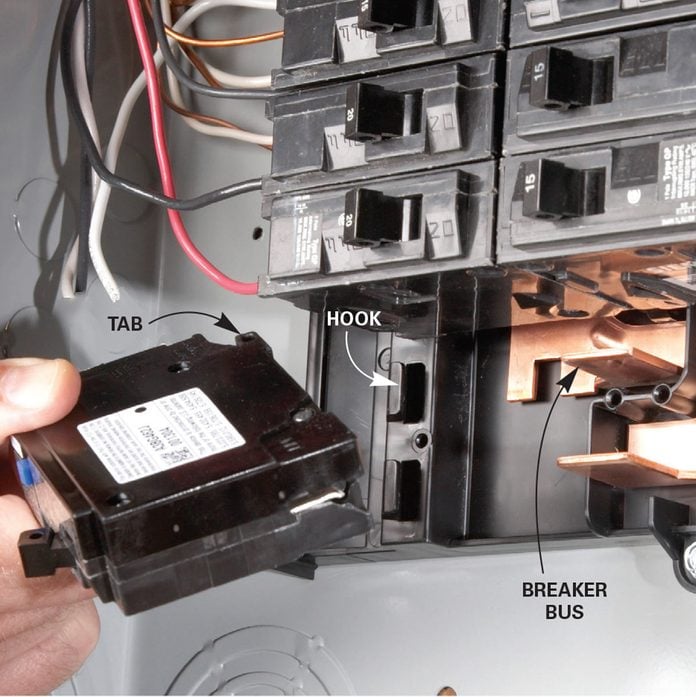
- Install the billow by slipping the tab into the hook.
- Then snap the breaker into place, forcing the slot onto the motorcoach.
- Pro tip: Nosotros're using an AFCI billow.
Pace ix
Strip and Clamp
- Neatly route the black and white wires to the empty breaker infinite.
- Adhere the wires to the breaker and then snap it into the box, or install the breaker first and insert the wires last.
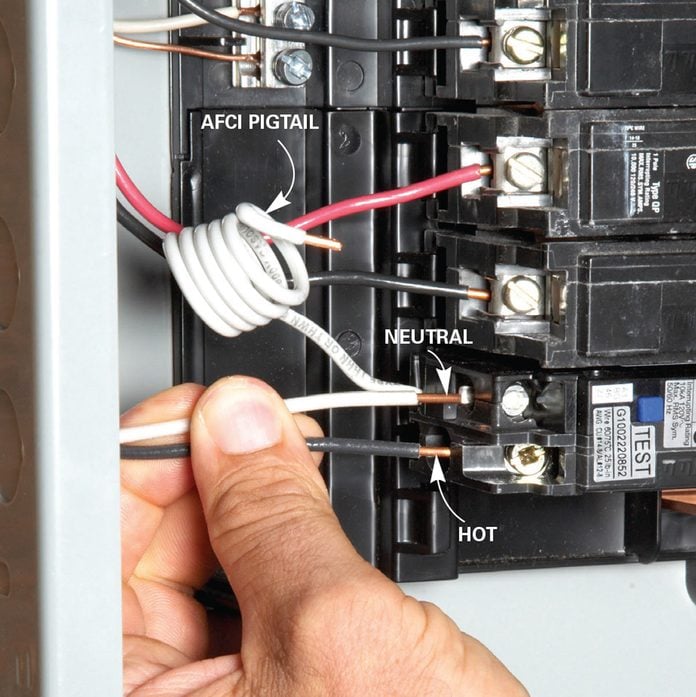
- Pro tip: Just exist aware that wiring an AFCI-mode billow is dissimilar from wiring ordinary breakers.
- The neutral (white) from the new cable attaches to the AFCI
- Strip off 5/eight-inch of insulation from the white and black wires and insert them into the AFCI terminals.
- Tighten until snug.
Step ten
Ground and Pigtail get to the Neutral Coach
- On a main panel, y'all connect the footing wire from the new cable and the neutral (white) pigtail from the AFCI to the neutral bus.
- Route the AFCI neutral pigtail and footing wires to empty screws on the neutral bus and tighten.
- If you're installing a breaker on a sub-panel, place the neutral and ground on separate coach bars.

Step 11
Test the Installation and Finish the Job
- Remove the panel box cover plate knockout that corresponds to the slot where you installed the new breaker (bend information technology back and forth until it breaks off).
- And so install the cover and plough on the main breaker.
- Switch the new AFCI to "ON."
- Look a few seconds and printing the "TEST" push.
- The breaker should trip.
- If it doesn't trip, refer to the parcel instructions for troubleshooting or call an electrician.

Footstep 12
How to Plan a New Branch Circuit
- You lot can usually mix lighting and receptacles on the same circuit. Simply it's not a practiced thought to identify lighting and receptacles in the same room on a single circuit. If the billow trips, you'll lose all the calorie-free fixtures and receptacles at the same time.
- If you're wiring living areas, you tin can install 10 to 13 lights and receptacles on a single xv-amp excursion. Locate the receptacles so you're never more than 6 feet away from one on each wall.
- Run a separate 15- or xx-amp circuit for each of these watt-sucking appliances: garbage disposer, dishwasher, microwave, vent hood, trash compactor, and space heater.
- Run a separate 20-amp circuit to each bathroom and laundry room. Install a minimum of two 20-amp circuits for the kitchen. Protect the receptacles with a ground-mistake circuit interrupter (GFCI) billow or GFCI-style receptacles.
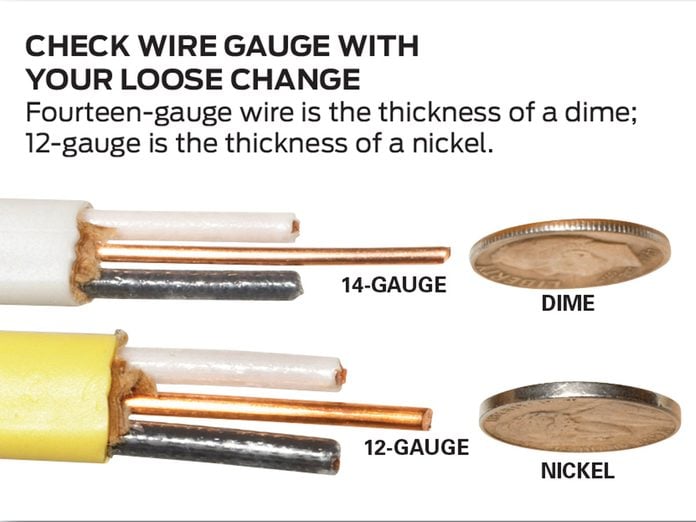
- Utilise 12-gauge cable for 20-amp circuits and 14-approximate for 15-amp. Many cablevision manufacturers color-lawmaking the outer jacket of their cable, but the colour schemes are not universal. So always double-check the wire itself to be sure.
- New co-operative circuits to all "living areas" (bedroom, living room, family unit room, den, dining room, library, sunroom, closet, hallway, and similar locations) must be connected to an arc-fault circuit interrupter (AFCI). AFCI breakers are pricey, so you may be tempted to purchase an ordinary $5 breaker. Don't. The electrical inspector volition just make y'all change it out.
Originally Published: March 31, 2021

Can Service Wires Enter Bottom Of Panel,
Source: https://www.familyhandyman.com/project/breaker-box-safety-how-to-connect-a-new-circuit/
Posted by: eppsdiesequan49.blogspot.com
0 Response to "Can Service Wires Enter Bottom Of Panel"
Post a Comment